
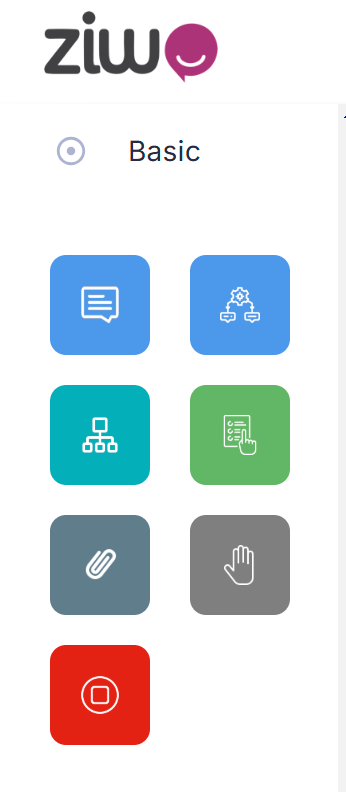
Chatbot Connectors
Introduction:
Chatbot connectors are essential building blocks that define how a chatbot interacts with users. They allow chatbots to manage conversations, provide responses, guide users through workflows, and offer interactive experiences. These connectors help the chatbot deliver an engaging and efficient user experience by responding to different user inputs and actions in a structured way. They enable the chatbot to communicate via various mediums such as text, buttons, attachments, and even escalations to human agents. The connectors are designed to offer flexibility, improve engagement, and streamline the chatbot's performance.
Features of Chatbot Connectors:
- Dynamic Responses: Connectors enable the chatbot to provide dynamic and personalized responses based on user inputs or selections. These responses can be text, images, buttons, or even links, allowing for a customized interaction.
- Structured Interaction: By using connectors like Interactive Messages and Choice Prompts, the chatbot can guide users through predefined paths and offer options that direct the conversation in a seamless flow. This keeps the user engaged and ensures that they stay on track throughout their journey.
- Multimedia Support: Connectors such as Attachments allow chatbots to send images, videos, or documents, enhancing the conversation and providing users with additional resources such as product images, brochures, or how-to guides.
- Escalation and Handover: The Switch connector facilitates handover from the chatbot to a human agent if the user’s query requires more complex or personalized assistance. This ensures that the user experience is smooth, even when the bot reaches its limitations.
- Session Management: Connectors like Start Dialog, Cancel, and End are used to manage the flow of a conversation. The bot can greet users, restart the session, or end the conversation gracefully, ensuring that the interaction feels natural and user-friendly.
- Error Handling and Acknowledgment: Chatbot connectors handle various user inputs, including errors. For instance, if a user provides incorrect or incomplete information, connectors ensure the chatbot asks follow-up questions or provides corrective prompts to keep the conversation flowing smoothly.
- Customizable Interactions: Most connectors allow for customizable messages that can be tailored based on the user's previous responses, location, or preferences. This personalizes the chatbot’s behavior, making it more effective and relevant.
- Seamless Transitions: With connectors like Switch, chatbots can seamlessly transition between different workflows or escalate issues to a human agent when necessary. This ensures continuity in the conversation and improves the overall user experience.
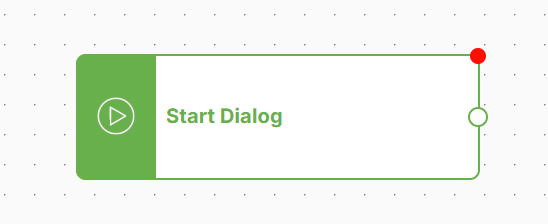
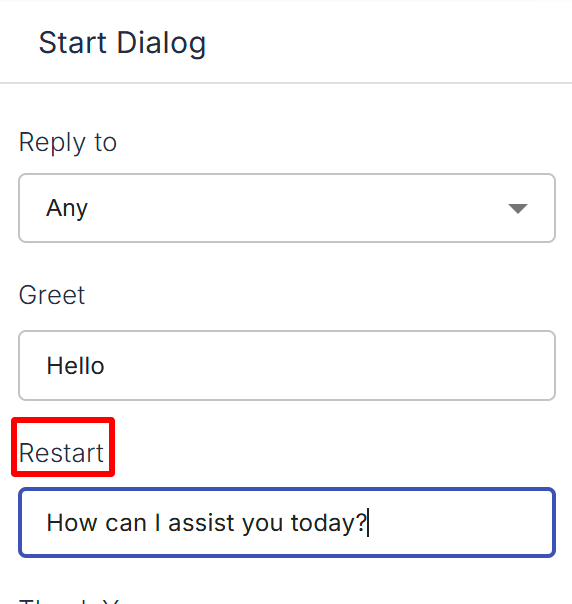
1. Start Dialog:
- Description: The "Start Dialog" connector is the initial trigger that initiates a conversation between the chatbot and the customer. This is the starting point of the interaction, where the chatbot can greet the user, ask for their information, or offer them choices to begin the conversation.
- Use Case: Typically, this connector is activated when the customer first interacts with the chatbot. It could be triggered by a user clicking a button, visiting a website, or even after an automated greeting.
- How It Works: The "Start Dialog" connector is the entry point of any chatbot interaction. When a user first engages with the chatbot, this connector is triggered, typically by a user action like clicking a button or opening a chat window. It initiates the conversation by greeting the user or offering a set of options to begin the interaction.
- Example Workflow:
User visits the website or opens the chat. Chatbot sends a greeting message such as “Hello! How can I assist you today?” User responds, and the chatbot processes the response to move to the next step in the conversation.
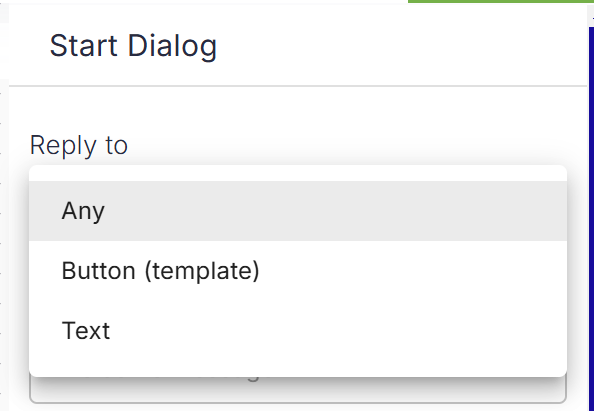
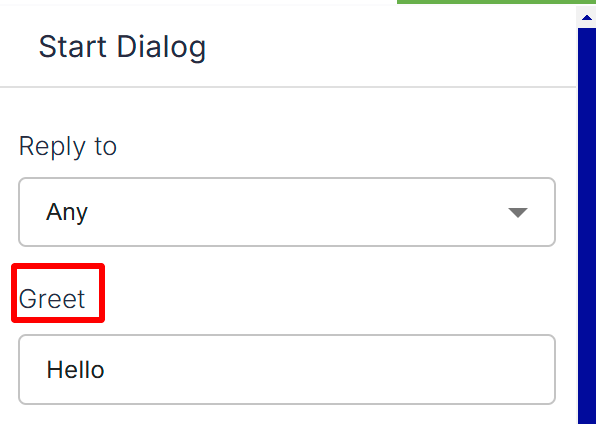
Start Dialog - Detailed Explanation of Parameters
- Reply to: any
-
Description: This setting allows the chatbot to respond to any message from the user. Whether the message is a greeting, question, or statement, the chatbot is ready to reply with an appropriate response based on the predefined logic.
-
How It Works: When a user sends a message, the chatbot listens for any input and responds accordingly. This ensures that the chatbot is always ready to handle user queries from the moment the conversation starts, without waiting for a specific trigger.
-
Reply to: button
- Description: This option configures the chatbot to respond only when a user clicks on a button or selects a predefined option. The response is triggered by the user choosing one of the available options presented by the chatbot, such as buttons or quick replies.
- How It Works:
After the chatbot sends an interactive message with buttons, the chatbot listens for the user to click one of the buttons. The button could contain options like "Track Order," "Browse Products," or "Talk to Support." Once a button is clicked, the chatbot responds based on the specific action or flow tied to that button. Example: If the chatbot presents options like: "Track Order" "Product Info"
-
Reply to: text
- Description: The text option configures the chatbot to respond only when the user sends a text message (i.e., a user types a message). This response type is best used when the chatbot needs to react to specific text input, like keywords or phrases that are expected from the user.
- How It Works:
When the user types a message, the chatbot checks the content of the text and responds based on that message or a keyword match. Example: If the user types “Where is my order?” the chatbot will recognize the text and respond with something like, “Can you please provide your order number so I can assist you with tracking?”
- Greet
- Description: The "Greet" message is a predefined welcoming message sent by the chatbot as soon as the conversation begins. It sets the tone for the interaction and encourages the user to continue the conversation.
- How It Works: After the user starts the interaction (e.g., opening a chat window or clicking the chatbot button), the chatbot automatically sends a friendly greeting, such as “Hello! How can I assist you today?” or “Hi there! How can I help you?” This initial message can be customized to reflect the brand's tone and voice.
- Restart
- Description: The "Restart" message is displayed when the user restarts the conversation. This could happen if the user clicks on a restart button or if the session has ended and needs to be resumed.
- How It Works: The chatbot will display a message like “Let’s start over!” or “Restarting the conversation. How can I assist you today?” This resets the conversation, clearing any previous context, and gives the user a fresh start to continue their interaction.
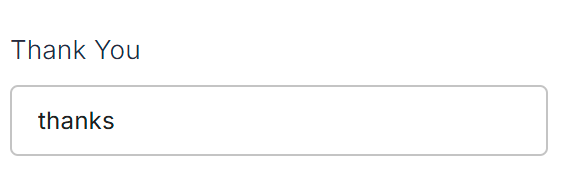
- Thank You
- Description: The "Thank You" message is triggered when the user thanks the chatbot for assistance. This message ensures politeness and acknowledges the user’s gratitude.
- How It Works: When the user says something like “Thank you” or “Thanks,” the chatbot responds with a message such as “You’re welcome! Let me know if you need further assistance,” or “I’m happy to help!” This keeps the interaction friendly and customer-centric.
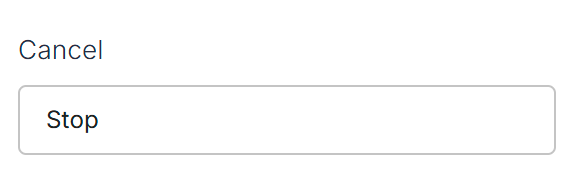
- Cancel
- Description: The "Cancel" message is displayed when the user decides to cancel or exit the conversation. It may occur if the user clicks a cancel button or types something like “Cancel” or “Stop.”
- How It Works: When the user initiates a cancellation, the chatbot acknowledges the request and provides a confirmation message, such as “Your request has been canceled. If you need anything else, feel free to ask!” or “Conversation ended. Have a great day!” This helps ensure the user feels in control of the interaction and can safely exit the chat.
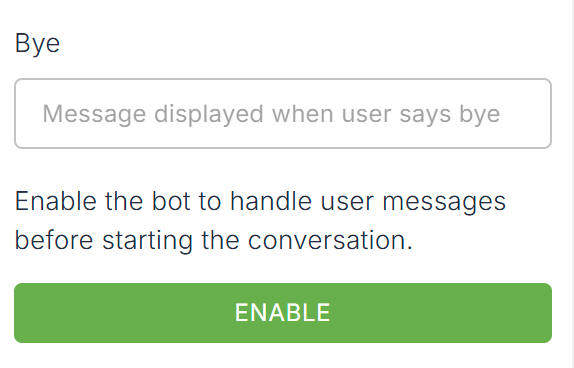
- Bye
- Description: The "Bye" message is displayed when the user says goodbye or indicates they are done with the conversation. It marks the end of the chat session in a polite and friendly manner.
- How It Works: When the user types a goodbye phrase like “Bye,” “Goodbye,” or “See you later,” the chatbot responds with a closing message, such as “Goodbye! Have a wonderful day!” or “Thank you for chatting with us. Take care!” This ensures a positive, professional end to the conversation.
Enable the bot to handle user messages before starting the conversation
- Click on the save button and name it and apply. The chatbot will start working.
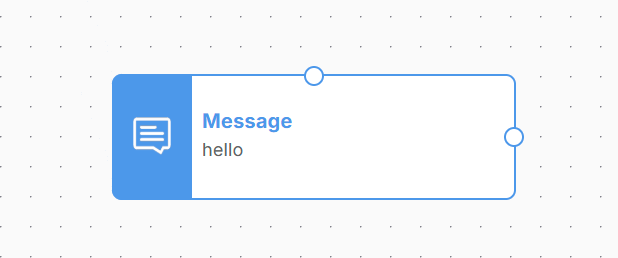
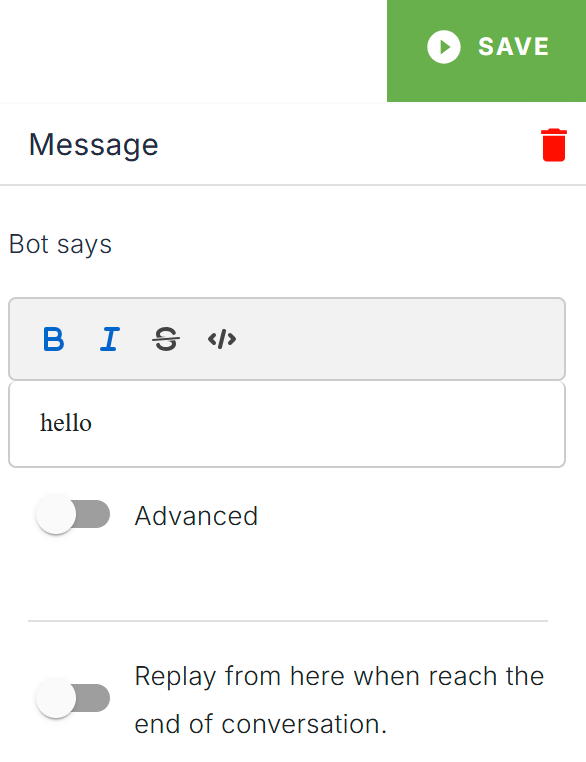
2. Messages Connector:
Introduction:
The Message Connector is one of the fundamental connectors in a chatbot, enabling the bot to send text-based responses to users. This connector is designed to handle simple and clear communication, allowing the chatbot to provide users with necessary information, answers to their questions, or instructions. The Message Connector ensures that the chatbot can deliver essential messages like greetings, information updates, responses to queries, and more in a straightforward manner. The Message Connector is essential for creating an engaging conversation flow, where the bot can provide context, clarify user queries, and guide the user through a process.
Features of the Message Connector:
- Text-Based Communication: The Message Connector is primarily used for sending plain text responses to the user. This is the most basic form of communication in a chatbot and is key to any interaction.
Example: “Your order has been shipped. You can track it here.” - Information Delivery: This connector allows the chatbot to provide users with information, updates, or instructions. For example, when a user asks about product details, the chatbot can respond with relevant data, descriptions, and links. Example: “Our latest product, the Smartwatch Pro, comes with a 5-day battery life and is available in three colors.”
- Customizable Content: The Message Connector can deliver dynamic, personalized messages based on the user's inputs or preferences. This is often powered by variables, allowing the bot to customize its responses based on user interactions or previous responses. Example: “Hi [User Name], how can I assist you today?” or “Your order #12345 has been shipped to [Address].”
- Multiple Responses: The Message Connector can send multiple messages in succession. This allows the chatbot to break down complex information into digestible chunks, providing clarity for the user.
Example: The chatbot can send a series of messages: “Here’s the summary of your order.” “Item 1: Smartwatch Pro” “Item 2: Wireless Headphones” “Total: $200” - Rich Text Formatting: Some platforms support rich text formatting within the Message Connector, allowing for the inclusion of bold, italics, bullet points, or other elements that help organize the text and make the information more readable. Example: “Here are your order details:
Item 1: Smartwatch Item 2: Wireless Earbuds.” - Structured Data: The Message Connector can include structured data, like lists, links, or product details, in the message to make the response more organized and actionable.
Working of the Message Connector
The Message Connector facilitates communication between the chatbot and the user by sending text-based responses. It allows the bot to send a wide range of message types, from simple greetings to detailed information, making it a key component in any chatbot interaction. Here’s how the Message Connector works in a step-by-step process:
- User Initiates Interaction
Step: The user starts the conversation by either typing a message or selecting an option (e.g., clicking a button). Example: A user types, “Hello” or clicks a button like “Track my order.” - Chatbot Identifies User Input
Step: The chatbot processes the user's input using natural language processing (NLP) or predefined keywords. It tries to identify the user’s intention (e.g., a greeting, request for information, order tracking). Example: The chatbot recognizes the input as a greeting. - Trigger Message Response
Step: Based on the identified intent, the chatbot triggers the appropriate message to be sent via the Message Connector. This could be a simple response, a series of messages, or even a prompt for further action. Example: If the user said, "Hello," the chatbot might respond with, "Hello! How can I assist you today?" If the user asked, "Where is my order?" the chatbot might respond with, "Please provide your order number to track your shipment." - Customization of the Message
Step: The Message Connector can include dynamic elements such as variables, images, buttons, or links. This allows the chatbot to tailor the message based on previous interactions or specific user data. Example: Dynamic Response: “Hello [User Name], how can I assist you today?” where the chatbot inserts the user’s name. Interactive Message: “Would you like to track your order or speak to support?” with buttons: [Track Order] [Contact Support]. - Sending the Message
Step: The message is sent to the user through the chatbot interface. Depending on the platform (e.g., web chat, mobile app, social media), the message is delivered in real-time. Example: The chatbot sends the text “Your order #12345 has been shipped. You can track it here: [Tracking Link].” - User Interacts (Optional)
Step: If the message includes interactive elements (e.g., buttons, quick replies), the user can respond by selecting one of the options. The chatbot will then process this input and respond accordingly. Example: The user clicks on a button like “Track Order,” and the chatbot responds with the status and tracking information. - Error Handling
Step: If the user provides an invalid or unrecognized input, the chatbot can use the Message Connector to send a polite error message. It may also provide suggestions or ask for clarification. Example: “I’m sorry, I couldn’t understand that. Could you please rephrase your request or select one of the options?” - End of Interaction (Optional)
Step: The chatbot can use the Message Connector to close the conversation when the interaction is complete. This can be a simple farewell message or a request for feedback. Example: “Thank you for chatting with us today! Have a great day ahead!”
In Ziwo's workflow, Interactive Messages Connectors are designed to create more engaging and interactive communication between the bot and the user. These connectors enable dynamic interaction by incorporating elements like buttons, carousels, quick replies, and more. By using these interactive elements, Ziwo can enhance the user experience, provide real-time options, and gather valuable responses more efficiently.
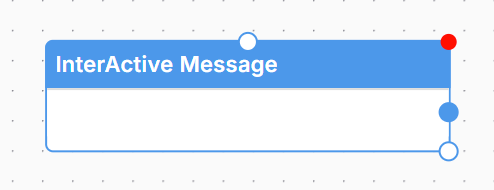
Here’s a breakdown of Interactive Messages Connectors in Ziwo's workflow:
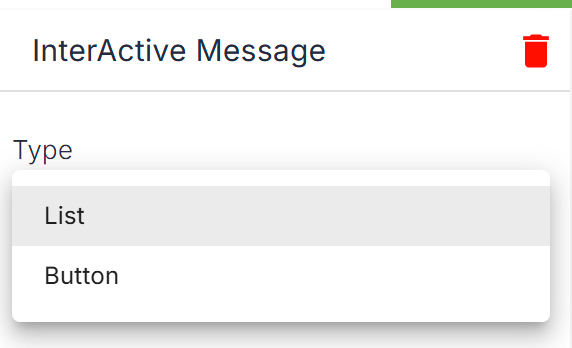
1. Interactive Buttons
-
Purpose: Buttons enable users to interact with the bot by selecting from predefined options, rather than typing responses.
-
Use case: You can offer users options like "Book Appointment," "Track Order," or "Learn More" in the form of buttons. Each button click triggers a specific action or response from the bot.
-
Example:
Bot: "Please choose an option below:"- "Book an appointment" (Button 1)
- "Track my order" (Button 2)
- "Contact Support" (Button 3)
2. Quick Replies
-
Purpose: These are short, predefined text responses that the user can choose from with a single tap. Quick replies make it faster for users to interact with the chatbot without typing.
-
Use case: This is useful when you want to limit the response options for the user and make the conversation smoother.
-
Example:
Bot: "Would you like to hear about our new features?"- "Yes" (Quick Reply)
- "No, thanks" (Quick Reply)
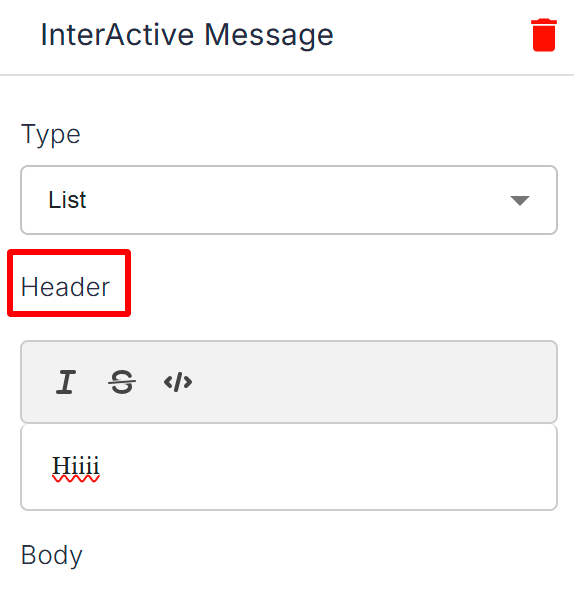
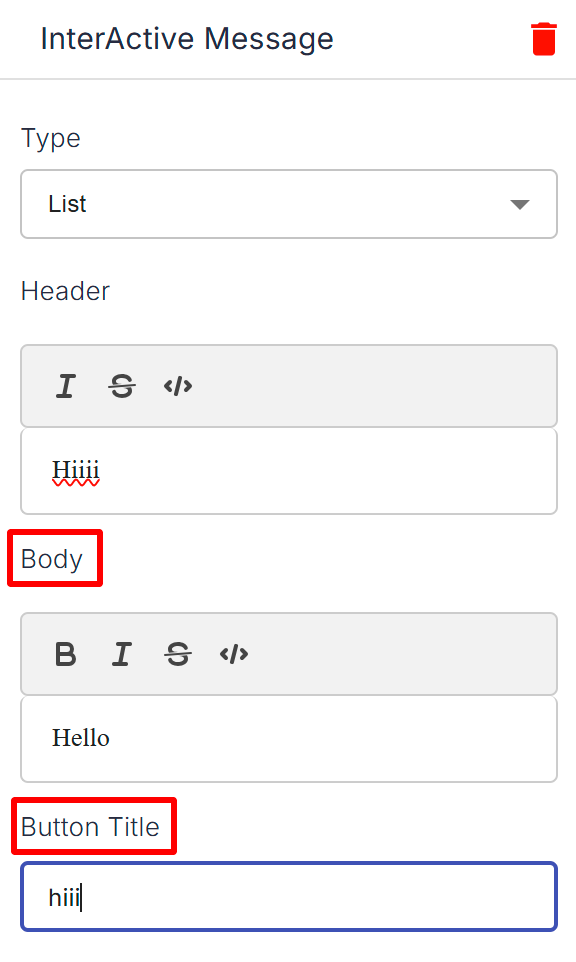
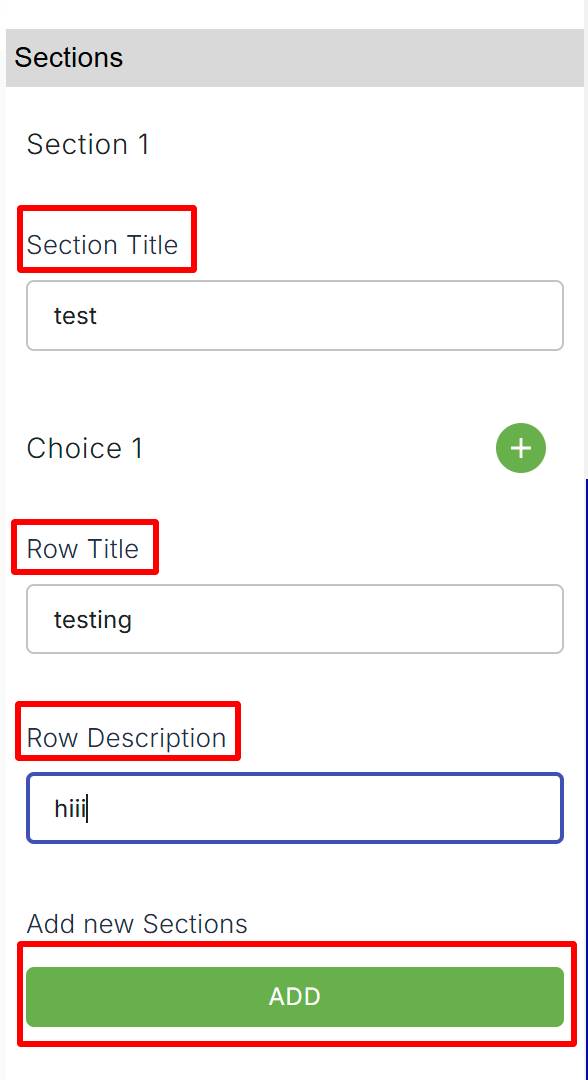
3. List Messages
-
Purpose: A list message presents multiple options in the form of a list, where the user can select one or more options. This can be used when you have a set of predefined choices that the user should pick from.
-
Use case: Ideal for presenting a list of items or categories that the user can select to proceed with their request.
-
Example:
Bot: "Choose a category to proceed:"- "Electronics" (Option 1)
- "Clothing" (Option 2)
- "Home Appliances" (Option 3)
4. Input Fields
- Purpose: Interactive message connectors can also include input fields, allowing users to enter specific information directly into the chat. This could be in the form of text, phone numbers, or email addresses.
- Use case: This is helpful when you need to collect details like user names, addresses, or other specifics from the user.
- Example:
Bot: "Please enter your email address to receive a discount code."- [User Input Field]
5. Reply to Specific User Actions
- Purpose: The bot can respond based on specific user actions, such as a button click or selecting an option. You can define specific triggers that guide the flow of the conversation.
- Use case: This is helpful in guiding users through different steps, like making a purchase, confirming a booking, or accessing customer support.
- Example:
Bot: "Thank you for selecting ‘Track Order’."- "Please enter your order number."
- [User Inputs Order Number]
How Interactive Message Connectors Work in Ziwo's Workflow:
-
Triggering Actions: The connectors are triggered based on user interaction. For instance, if a user selects a button, a follow-up action is activated, which may lead to a response, another button, or a form request.
-
Sequential Flow: The interactive message connectors maintain a smooth, sequential flow of conversation, guiding the user step-by-step through options, choices, and requests.
-
User Engagement: These connectors are designed to keep users engaged in the conversation, giving them an interactive, user-friendly experience. It reduces friction, making it easier for users to get the information they need quickly and effectively.
-
Integration with Other Connectors: Interactive messages can be combined with other Ziwo connectors, like API calls, callbacks, and CTI integrations, for a comprehensive, seamless user experience.
-
Customization: Interactive messages can be customized to fit the needs of your business or application, ensuring that the options presented to users are relevant and personalized.
Features of Interactive Message Connectors:
- User-Friendly: Make conversations more interactive and visually appealing.
- Customizable: Buttons, quick replies, carousels, and other options can be tailored to match specific use cases.
- Efficiency: Helps streamline user interactions by reducing the need for users to type long responses.
- Integration: Easily integrates with backend systems and APIs for dynamic and personalized content delivery.
Interactive message connectors in Ziwo workflow empower businesses to create rich, engaging, and dynamic conversations that drive user satisfaction and streamline service delivery.
4. Attachment Connector
Here is a detailed document for the Attachment Connector in the Ziwo Workflow, including its parameters:
Attachment Connector in Ziwo Workflow
The Attachment Connector in Ziwo Workflow allows users to handle attachments within their workflows, enabling the uploading and management of attachments, such as images or other files, during various stages of a process.
This connector is designed to be used when you need to send or store attachments as part of a larger workflow. It helps automate the handling of files without manual intervention.
Parameters of the Attachment Connector:
1. Attachment Type
- Description: This parameter defines the type of attachment you are working with. It specifies the kind of file or content you are uploading or managing within the workflow.
- Available Options:
- Image: The attachment is an image file (e.g., JPG, PNG, GIF).
- Document: The attachment is a document file (e.g., PDF, DOCX).
- Audio: The attachment is an audio file (e.g., MP3, WAV).
- Video: The attachment is a video file (e.g., MP4, AVI).
- Other: Used when the attachment is of a different file type.
2. Attachments
- Description: This parameter is used to specify the attachments that are being processed. Depending on the workflow, you might specify files to upload or download as part of the process.
- Available Options:
- None: No attachments are being uploaded or processed at this stage.
- Upload Attachment: Specifies that an attachment is to be uploaded to a system or stored.
- Below Attachment: Refers to an attachment file placed below a certain step or field within the workflow. It can be an image, document, or other file type placed at a specific point in the process.
How the Attachment Connector Works in Ziwo Workflow
- Image Upload Example:
- If you want to upload an image as part of your workflow, you would select the Attachment Type as Image.
- You could then specify whether there are no attachments (None), an upload attachment action, or a file to be processed below another element in the workflow.
- Handling Documents and Other Files:
- The same approach applies when handling documents, audio, video, or other files. The system allows you to attach these files during the workflow process, depending on your needs. Each type of file is handled differently depending on the system's capacity for storage or the application’s needs.
Example Workflow Usage
-
Step 1: File Upload
- Attachment Type: Image
- Attachments: Upload Attachment
In this case, the workflow triggers the upload of an image, and the system will process the file accordingly.
-
Step 2: File Reference
- Attachment Type: Document
- Attachments: Below Attachment
In this scenario, the workflow specifies a document to be referenced, or the attachment is placed below a certain process step. This might involve attaching a contract, report, or PDF for review in a subsequent workflow step.
Conclusion
The Attachment Connector in Ziwo Workflow simplifies the management and handling of various attachment types, allowing users to automate file uploads, downloads, and references during the workflow process. By defining the appropriate Attachment Type and selecting the correct Attachments parameter, you can efficiently manage file-based tasks within the workflow.
5. Switch Connector:
The Switch Connector in the Ziwo workflow is a powerful tool designed to allow users to set up conditional logic within their automated workflows. This connector enables you to define specific conditions that will determine the flow of the process based on certain criteria.
How the Switch Connector Works:
-
Condition Setup:
- You can define multiple conditions that evaluate a specific variable or value.
- Conditions can be based on String, Numeric, Boolean, or Date types, among others.
-
Operators:
- Conditions within the Switch Connector typically involve operators such as
=,!=,>,<,>=, and<=, allowing for precise comparisons of values. - For example, you can use the
=operator to check if a specific string or value is equal to another (e.g., First Operator = Second Operator).
- Conditions within the Switch Connector typically involve operators such as
-
Conditional Flow:
- Once a condition is set up, you can define what happens when the condition evaluates to
TrueorFalse. - This branching allows you to create multiple pathways for your workflow, where the process can diverge based on the conditions you specify.
- Once a condition is set up, you can define what happens when the condition evaluates to
-
Adding New Conditions:
- The Switch Connector supports adding multiple conditions to create complex, multi-branch workflows.
- This flexibility enables the creation of intricate business rules or automation flows that react dynamically to varying data inputs.
Example of a Condition in the Switch Connector:
- Condition 1:
- Type: String
- First Operator:
Customer_Type - Operation:
= - Second Operator:
VIP
- This condition checks whether the
Customer_Typeis equal toVIP, and based on this, the workflow will either continue down the VIP path or follow a different branch for non-VIP customers.
The Switch Connector in Ziwo simplifies complex decision-making processes and ensures that workflows are adaptive to different data inputs, providing a dynamic and customized experience for customers or users.
6. Choice Prompt Connector:
Choice Prompt Configuration in Ziwo Workflow:
The Choice Prompt is an essential feature in Ziwo workflows that allows the bot to present a set of options to the user. These options are displayed as clickable choices, making it easy for users to interact with the bot.
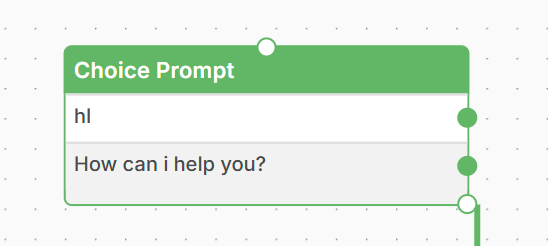
Key Elements of the Choice Prompt:
-
Message Displayed on the Card:
- This is the main message that will appear to the user on the interface (usually a card) when the bot is prompting for input. It should clearly explain the options the user can choose from.
- Example: "Please choose your preferred option."
-
Bot Says:
- This is the actual text the bot will use to prompt the user.
- Example: "What would you like to do next?"
-
Clickable Choices:
- The choices are the options presented to the user. Each choice represents a possible response or action the user can take.
- You can configure multiple choices for users to select from.
-
Choice 1:
- Text: "Track my order"
- Recommended to keep each choice text under 40 characters to ensure it fits well on mobile screens and is easy to read.
-
Add New Choice:
- You can add as many choices as necessary for your workflow. For example, the options might include things like:
- Choice 2: "Get customer support"
- Choice 3: "View account details"
- Choice 4: "Cancel request"
- You can add as many choices as necessary for your workflow. For example, the options might include things like:
-
Example Configuration:
- Message Displayed on the Card: "How can we assist you today?"
- Bot Says: "Please choose one of the following options."
- Choice 1: "Track my order"
- Choice 2: "Get customer support"
- Choice 3: "View account details"
- Choice 4: "Cancel request"
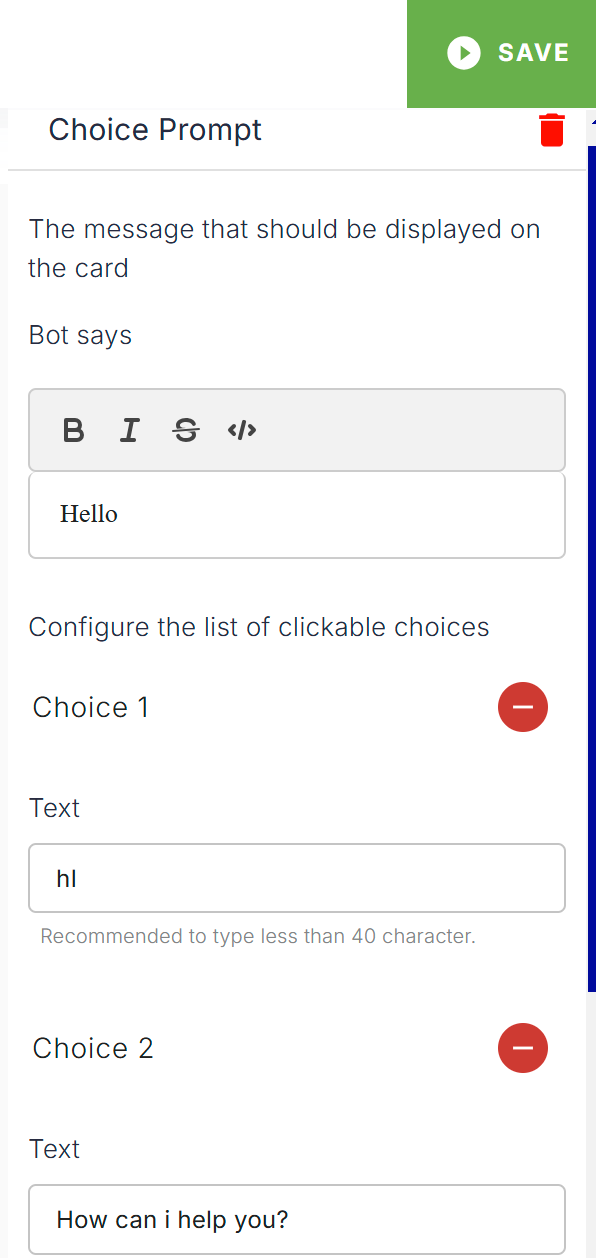
With these choices, users can easily navigate through the available options, making the interaction smoother and more intuitive. Each choice can then lead to a new action or pathway based on the user’s selection.
7. Human Handover Connector :
Human Handover Connector in Ziwo Workflow:
The Human Handover Connector is a crucial feature in Ziwo workflows that allows the conversation to be transferred from the bot to a human agent seamlessly. This connector ensures that when the bot reaches a point where it cannot fully resolve an issue or when the user requests human assistance, the conversation can be passed to a live agent for further support.
Key Features of the Human Handover Connector:
-
Triggering the Handover:
- The human handover is typically triggered based on specific conditions, such as:
- The user requests to speak with a human (e.g., typing “I need help” or “Talk to an agent”).
- The bot detects that it cannot resolve the user's issue or needs further expertise.
- The bot has reached the end of its capabilities or the user has had enough of automated responses.
- The human handover is typically triggered based on specific conditions, such as:
-
Bot Says in Human Handover:
- When initiating the handover, the bot can provide a message informing the user that they will be connected to a human agent.
- Example messages for Bot Says:
- “I’m transferring you to one of our agents. Please hold on for a moment.”
- “I’ll connect you to a human agent who can assist you further.”
- “A support agent will join you shortly to help resolve this issue.”
-
Human Agent Availability:
- The handover process relies on the availability of human agents. The workflow should be designed to check if an agent is available, or if not, provide a message such as: “All agents are currently busy, but we’ll get back to you as soon as possible.”
- You can also configure automatic notifications to agents when a handover is triggered.
-
Seamless Transition:
- The handover process should be as smooth as possible. Relevant context, like user queries or conversation history, can be passed on to the human agent so they can pick up the conversation right where the bot left off. This minimizes the need for the user to repeat information.
Example Workflow for Human Handover:
-
Bot Interaction:
The bot asks the user for their issue and attempts to resolve it. -
User Requests Human Assistance:
- User: "I need to speak with an agent."
- Bot Says: “I’ll connect you to a human agent who can assist you further. Please hold on.”
-
Human Agent Joins the Conversation:
- The conversation is handed over to a live agent who takes over from where the bot left off.
-
Bot Says After Handover:
- "Please wait while I connect you to an available agent."
Benefits of the Human Handover Connector:
- Improved Customer Experience: Ensures users can always escalate issues to a human if needed, providing a personalized touch when required.
- Better Support Handling: By offloading basic tasks to the bot and only escalating more complex issues, the human agents can focus on high-priority cases.
- Enhanced Flexibility: It provides flexibility in the workflow, allowing for a smooth transition from automation to human interaction when necessary.
The Human Handover Connector ensures that users get the best of both worlds: quick automation for simple tasks and human intervention when things get complex, ultimately improving the overall user experience and satisfaction.
8. End Connector :
End Connectors in Ziwo Workflow:
In a Ziwo workflow, End Connectors signify the conclusion of a particular path or flow. When the bot reaches an end connector, it signals that the interaction is complete, and no further actions are needed unless the workflow is restarted or re-triggered. End connectors help in clearly defining where the workflow should terminate after a series of actions or user inputs.

Bot Says in End Connectors:
When the end connector is triggered, you can configure a final message for the bot to say. This message typically informs the user that the interaction has come to an end, or that their request has been completed.
Example of Bot Says in End Connectors:
-
Message Examples:
- "Thank you for contacting us! Have a great day!"
- "Your request has been completed successfully. Goodbye!"
- "We've processed your information. Feel free to reach out if you need further assistance."
- "Your session has ended. Please contact us again if you need any help."
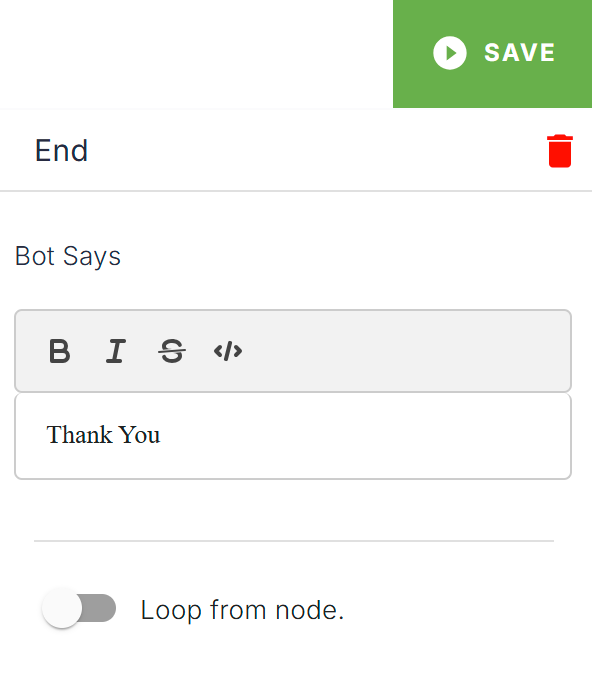
-
Bot Says in an End Connector Configuration:
- Bot Says: "Thank you for your time. We hope to assist you again soon!"
- This message can be personalized depending on the specific purpose of the workflow, whether it's confirming a transaction, closing a support case, or simply ending the conversation.
Functionality of End Connectors:
- Completion of Process: When an end connector is reached, it indicates the successful end of the current process, ensuring no further actions are triggered.
- Closing Conversations: It can be used to close conversations with a polite final message or a simple goodbye.
- Optional Feedback Requests: Sometimes, you may also prompt the user for feedback, for example: "Would you like to rate your experience?"
Using End Connectors effectively helps in managing user expectations and ensuring smooth workflow transitions.
.