
Append Data Operation
Append Data Operation: Google Sheets Connector
The Append Data Operation in the Google Sheets Connector allows you to automate the process of adding new data to a Google Sheets document. With this operation, you can append rows of data directly to the end of a sheet, ensuring that new data is added after the last current row in the sheet that has data.
This operation is ideal for workflows where new records or data entries need to be added continuously without overwriting existing content.
Setting Up the Append Data Operation
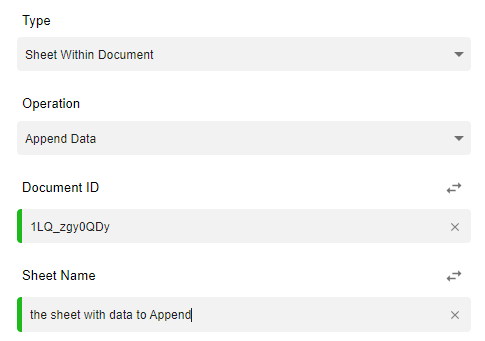
To append data to an existing sheet in a Google Sheets document, follow these steps:
-
Choose the Append Data Operation:
- In the Google Sheets Connector, select the Append Data operation to add new data to your sheet.
-
Provide the Document ID:
- Specify the Document ID of the Google Sheets document where you want to append data.
- The Document ID can be found in the URL of the Google Sheets file. For example, in the URL:
the Document ID is 1LQ_zgy0QDy.https://docs.google.com/spreadsheets/d/1LQ_zgy0QDy/edit
-
Specify the Sheet Name:
- After specifying the Document ID, enter the Sheet Name where you want to append the data.
- To find the correct Sheet Name, refer to the Create Sheet Operation where you defined the name of the sheet you want to append data to.
Appending Data to the Sheet
-
Adding New Rows:
- The Append Data operation will add each new row after the last row that already contains data in the specified sheet.
- Each new entry will automatically be placed in the next available row without overwriting any existing content.
-
Adding Cells and Entering Data:
- For each row you append, you can specify the individual cells and enter the data for each one.
- You can add multiple cells within a row, and each cell can contain different types of data (text, numbers, dates, etc.).

Adding Multiple Rows and Cells
-
Multiple Rows:
- If you need to add multiple rows of data, you can do so by clicking the Plus Icon to add additional rows.
- This ensures that each row is added after the last populated row in the sheet, preserving the order of data.
-
Multiple Cells per Row:
- You can also add multiple cells within each row by clicking the Plus Icon for each individual cell.
- Each cell can contain different values or data, allowing for dynamic and flexible data entry.
Example Use Case
Let’s say you are working with a Google Sheets document that tracks customer orders. You want to automate the process of adding new order data to the "Orders" sheet after each new transaction.
- Step 1: Provide the Document ID of the Google Sheets file.
- Step 2: Specify the Sheet Name, for example, "Orders".
- Step 3: Add a row to append data for a new customer order. You might include:
- Cell 1: Customer Name (e.g., John Doe)
- Cell 2: Order Date (e.g., 01/17/2025)
- Cell 3: Order Amount (e.g., $250)
- Step 4: Add additional rows and cells as necessary for more customer orders.
By running the workflow, the new order data will automatically be added to the end of the "Orders" sheet without overwriting any existing records.
Key Benefits of Append Data Operation
- Non-destructive: Data is added at the end of the sheet, ensuring that existing data is not overwritten.
- Dynamic Data Entry: You can append multiple rows and cells, enabling flexible and scalable data management.
- Automation: Automate the process of adding new data, reducing manual input and the potential for errors.
The Append Data Operation is ideal for scenarios where you continuously collect data, such as customer orders, survey responses, or event registrations, and need to store that information in a structured manner within a Google Sheets document.
Updated over 1 year ago